|
Subscription
Documentation |
Subscriptions
Screen Shots |
|
Subscription Payment
Processing
|
|
|
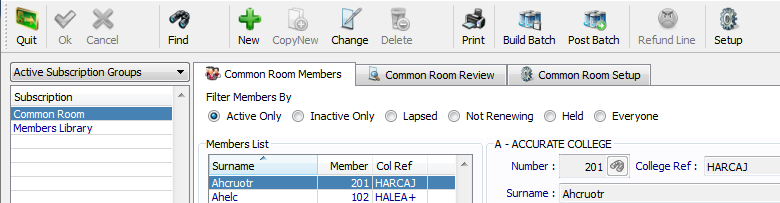
The Subscriptions main screen lists
the active subscription groups in the review list on the left hand side of
the screen. The right hand side panel holds pages for 1)
Maintaining Members; 2) Reviewing Members in Detail; 3) Subscription Group Setup. You can choose to show ‘Active
Subscription Groups’ or ‘Inactive Subscription Groups’ by selecting from the
drop down above the left hand list of subscriptions. Subscription charges are also raised
through this system by first ‘building’ a batch of charges to be posted and
then posting them through to the Fees and Charges system. See Subscription Payment Processing. Term Calendars can also be
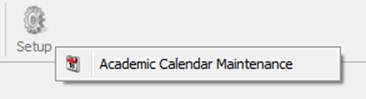
maintained by Clicking ‘Setup’ and selecting ‘Academic
Calendar Maintenance’ from the popup menu.
|
Figure 1: Subscriptions is broken down into the left hand list of subscriptions, and the 3 pages for members, review and setup
Figure 2: Selecting Academic Calendar Maintenance from the top Toolbar |
|
Page
1, Members, is used to add, delete and amend member details for a
Subscription Group. Choose
the Subscription Group from the left hand groups list. This will show all
‘Active’ members by default in the Members List. Review Members When
you click onto a Subscription Group it will show a list of Active Members (by
default) for that selected group. Using
the ‘Filter Members By’ radio buttons you can alternatively filter by other
member statuses. The
member subscription details for this group are then listed on the first page
(Subscription) of the member’s details record. You can also review a list of
‘All Subscriptions’ for that member, ‘Billing’ history for this group for
this member and a cut-down snapshot of the member record in ‘Member Info’. A
fuller review is available on the second page detailing additional member
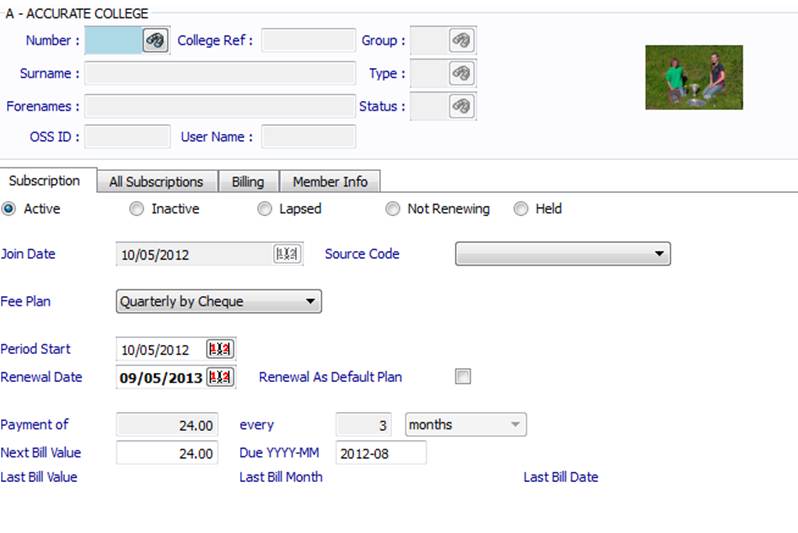
details for those members within the group. Add Member To
add a new member to the Subscription Group, click New
on the top toolbar. This will present you with a cleared Member Subscription
Section, although the default Fee Plan will have been brought across, such as
payment and renewal information. Enter
the Member Number or click the zoom button
next to Member Number to find the member in the database. You
can then either accept the defaults for the member record or change details
such as Period Dates and Payment Details. If
you amend the Fee Plan details so that they differ from the Default Fee Plan
you can tick ‘Renewal as Default Plan’ to ensure that at renewal time the
member is returned to the normal Default Fee Plan. Save
the details of the new member by clicking Ok
on the top toolbar. Edit Member With
a member highlighted in the ‘Members List’ click the Change
button on the top toolbar. The member record is then open for changes
to be made, including fee plan, renewal details and next fee payment details. Click
Ok from the top toolbar to save changes
|
Figure 3: Setting Up a Member Subscription
Figure 4: Member Subscription Section |
|
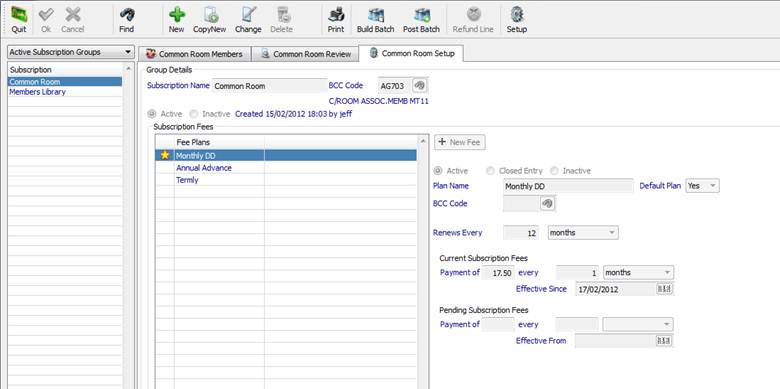
Subscription
Group Setup (page 3) To create or change the details of a
Subscription Group, including fee plans, you require the ‘Setup’ Page from
within Subscription Maintenance. If a Subscription if highlighted on the left
hand side the setup page will have the group within the page title (e.g.
‘Common Room Setup’ when ‘Common Room’ is the highlighted subscription
group). Add
Subscription Group Within
the Setup Page, click the New button on the
top toolbar to create a new Subscription Group. This
will provide a cleared Group Details page for you to create the new group. You should
enter the Subscription Name, Charge Code (BCC Code) and at least one Fee
Plan. You can
have as many Fee Plans as you wish, although only one can be the default fee
plan, highlighted by a star next to its name in the list of plans. To add a
new fee plan, click the New Fee button above
the Fee Plan details. When
you are happy with the Subscription Group and Fee Plans click Ok on the top toolbar to save.
|
Figure 5: Subscription Setup (Page
3) |
|
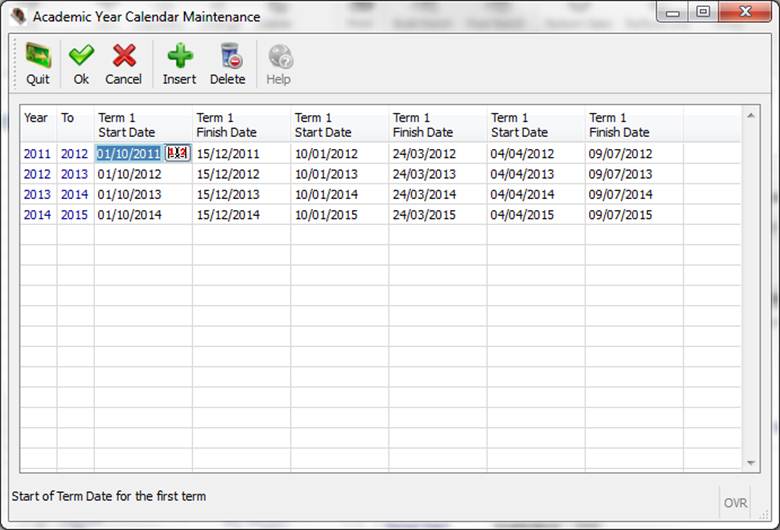
Academic Calendar Maintenance is
available (subject to permissions) from the ‘Subscriptions’ and ‘Clubs and
Societies’ modules, though the ‘Setup’ button on the top toolbar. Within the popup window you can
maintain each academic year, setting start and end dates for each term. You are able to insert earlier years
by clicking Insert when on the first line, or
append a new year by moving to the first blank line after the last academic
year. You cannot leave missing years, so for
this reason the academic years are populated for you to be immediately before
the first year or after the last year in the calendar. You can delete an
entry – but only ever the last entry in the list. Click Ok to
save the changes.
|
Figure 6: Academic Calendar Maintenance requires sequential academic years with no gaps |